I may earn a commission at no extra cost to you. #ad
10 DIY Gender Reveal Decoration Ideas: A Free Step-by-Step Guide
Jump to Section
- 1. The Classic Balloon Reveal Box
- 2. Ombre Crepe Paper Backdrop
- 3. Personalized Sonogram Photo Garland
- 4. DIY Pink and Blue Tissue Tassels
- 5. "What Will Baby Bee?" Centerpieces
- 6. Hand-Painted Wooden Welcome Sign
- 7. Rustic Fabric Scrap Bunting
- 8. Mini Table-Top Balloon Arch
- 9. Custom Confetti Popper Station
- 10. Chalkboard Reveal Countdown
- Pro Tips for DIY Decor Success
- Frequently Asked Questions
Hosting a gender reveal party is one of the most exciting milestones in your pregnancy journey. While professional planners can cost a fortune, creating your own DIY gender reveal decorations adds a personal, heartfelt touch to the celebration. Whether you are aiming for a classic "Pink or Blue" theme or something unique like "Boho Rainbows," these ten ideas will help you transform your space on a budget.
1. The Classic Balloon Reveal Box
The centerpiece of many reveals is the big box opening. You can make this yourself by taking a large shipping box and covering it with wrapping paper or white contact paper. Paint "He or She?" or "Boy or Girl?" on the outside using stencils. Fill the box with helium balloons in the color of the baby's gender. When you open the lid, the balloons float up for a perfect photo opportunity.
2. Ombre Crepe Paper Backdrop
Create a stunning photo booth backdrop using inexpensive crepe paper streamers. To get the ombre effect, choose three shades of pink and three shades of blue. Cut the streamers into long strips and tape them to a horizontal rod or directly to the wall, transitioning from the darkest shade to the lightest. This provides a high-impact visual for very little cost.
3. Personalized Sonogram Photo Garland
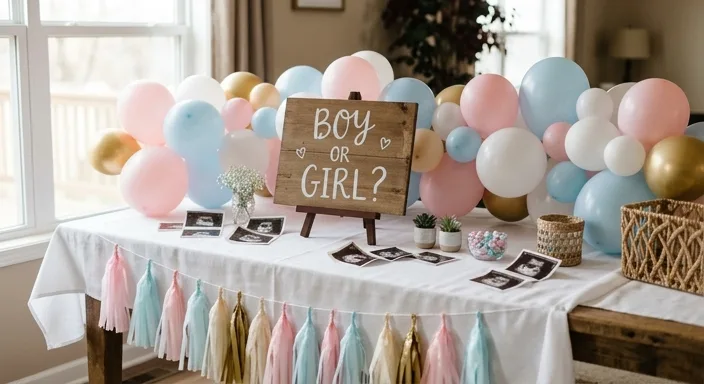
At sonogramparties.com, we believe the baby should be the star! Scan your latest sonogram and print 10-15 copies on cardstock. Use a hole punch and some twine to string them together. You can alternate the sonogram photos with cut-out hearts or baby onesies. It’s a beautiful way to share your journey with your guests.
4. DIY Pink and Blue Tissue Tassels
Tissue tassels are versatile and trendy. Fold sheets of tissue paper in half, cut fringes towards the fold, and then roll them up to create a tassel. String these along your dessert table or attach them to the bottom of large balloons. Use a mix of metallic gold, light pink, and baby blue for a sophisticated palette.
5. "What Will Baby Bee?" Centerpieces
This "neutral" theme is a fan favorite. Buy small mason jars and fill them with yellow and black shredded paper. Stick a DIY paper bee onto a wooden skewer and place it in the jar. Add a small pink and blue ribbon around the rim of the jar to keep the mystery alive until the big reveal.
6. Hand-Painted Wooden Welcome Sign
Find a piece of reclaimed wood or buy a cheap plywood board from a hardware store. Sand it down and use acrylic paint to write a welcoming message like, "Welcome to [Family Name]'s Gender Reveal." Decorate the corners with painted flowers or tiny baby footprints. This acts as a great keepsake for the nursery later.
7. Rustic Fabric Scrap Bunting
If you have extra fabric lying around, cut them into triangles or long strips. Tie them onto a piece of jute twine to create a rustic bunting. Mix textures like lace, burlap, and cotton in pink and blue shades. This looks fantastic draped over a gift table or hung across a mantle.
8. Mini Table-Top Balloon Arch
You don't need a professional to make a balloon arch. Buy a DIY balloon strip kit and a mix of 5-inch and 12-inch balloons. Inflate them to varying sizes and snap them into the strip. Secure the strip to the edge of your main table using Command hooks for a professional-looking frame for your cake.
9. Custom Confetti Popper Station
Create a "guest participation" station. Purchase clear plastic push-pop containers and fill them with homemade confetti (use a hole punch on colored paper). Wrap the outside of the tubes in white paper so no one can see the color inside until they push the handle! Label them "Pop to See!"
10. Chalkboard Reveal Countdown
Use a large chalkboard to display "Old Wives' Tales" or a "Mom vs. Dad" prediction tally. Use liquid chalk markers for crisp lines. It encourages guests to interact and vote on what they think the baby is before the main event happens. Plus, it serves as a great chronological marker in your party videos.
Pro Tips for DIY Decor Success
When tackling DIY decorations, organization is key. Here are three tips to ensure your party looks amazing without the stress:
- Batch Your Work: Spend one evening doing all the cutting and another evening doing all the gluing. This is much faster than doing one item at a time.
- The "Invisible" Rule: Use clear fishing line and transparent tape for hanging things. It makes your decorations look like they are floating and keeps the focus on the colors.
- Recruit Help: If you're keeping the gender a secret from yourself, give the "gender envelope" to a trusted friend who can handle the color-specific DIY tasks for you.
Frequently Asked Questions
DIY decorations can cost anywhere from $20 to $100 depending on the materials you already have. Using items like cardboard boxes, tissue paper, and printed sonograms makes it very affordable.
It is best to start 2-3 weeks before the party. This gives you enough time to gather materials and assemble items like garlands or balloon arches without feeling rushed.
Absolutely! We recommend scanning your sonogram and printing copies to create garlands, centerpieces, or guest books to keep the original safe.